Wednesday, May 25, 2011

A different take on DIY

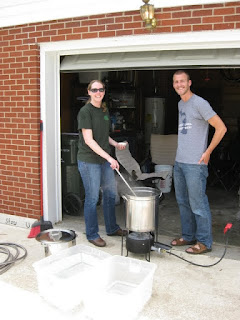
On Saturday, in honor of American Craft Beer Week, Jason and I brewed 3 beers: a Rogue Dead Guy Ale clone, a Black IPA, and an Extra Pale Ale. Though we make really good beer, we are still amateur enough that we use extract kits to brew. This means that rather than using an all grain brewing process we use malt extract that has already been created from the grains. This simplifies the process and requires a lot less equipment.

First you smack the yeast packet between your palms.


It starts out this thin but in a few hours it will expand so large the packet looks like it will burst. For two of the three beers, we actually made yeast starters where the yeast in this packet multiply and then are added to some boiled malt extract so they will multiply even more. This is important if you are brewing beers with high original gravity.


Time to light the fire. We used to do this on the stove but now use the "Bayou Classic" with a propane tank to brew with a full five-gallon boil. This was our first step toward all-grain brewing and should improve the quality of the beer versus adding 3 gallons of water at the end of the boil as we used to.

Pour the grains into a mesh bag (provided with kit).


Tie a knot at the top of the mesh bag. Then heat one gallon of
water on the stove to 150 degrees then steep the grains for 20 minutes or until
they reach 170 degrees. I was having some bag luck with keeping the
temperature consistent with our stove so fingers crossed it didn't hurt the beer.
Add the one gallon from inside to the four gallons heating outside.
Bring to a boil for one hour...eat lunch while keeping an eye on the pot.
You definitely want to avoid a boil over. No fun!


Fellow home brewers from Kirksville came over to
join in the fun! Here I am about to pour in a hop addition.


The 0 minute hop addition
The Black IPA had 6 ounces of hops. The first addition was 1 oz. of Summit hops with an alpha of 18.75% for the entire 60 minutes of boiling. This should be one hoppy, bitter beer (in a good way). I'm very excited!! Hops are added at different times for different reasons throughout the boil. Those Summit hops were for bittering and therefore were added at the beginning. The Cascade and Centennial hop additions at the 15, 10, and 5 minute mark as we counted down from 60 minutes were for creating a nice citrusy, hop flavor. Then the 1 oz. at the 0 minute mark is for aroma. The final 1 oz. I'll dryhop it with in a few weeks will give that extra over the top kick of hoppiness.

The Extra Pale Ale had only 3 ounces of hops by comparison and will not be dryhopped.


Here you can see clear tubes coming out of the pot.


When you are boiling beer it is called wort. It sounds lovely doesn't it? Anyway, these clear tubes are coming out of a wort chiller called Chillzilla. (Some of you met Chillzilla at our couple wedding shower in Iowa last summer). Our garden hose is hooked up to one end of this contraption and pumps cold water through a series of copper coils. The water in the coils warms and is pumped out the tubes at the other end pulling heat away from the wort. This is a critical stage in brewing where you want to cool the wort as fast as you can while also not exposing it to contaminants.

Brewing spectators
More spectators and lovers of our homebrew


We had a successful brew day with lots of support and lots of fun. Now we wait...in about a week and a half we'll siphon these beers into a secondary fermentation. Essentially put it a clean fermenting bucket. After another two weeks of fermenting we will siphon the beer into 5-gallon ball-lock kegs. We hook the kegs up to the CO2 tank in our four-tap kegerator and push gas through them for a couple days. After that the beer will be ready to drink so come pay us a visit!


Wednesday, May 18, 2011

J'ai fini

I bet you thought you signed up to read a blog about cooking and homebrewing...ha! Instead all you get is... 


This and

this isn't it?
Don't despair because.........my flower garden is finished! Victory! (Well sort of we'll see what the moles and four days of rain on a slope does to the garden.)

My blank canvas (ha!)

All the new flowers snug in their (flower) bed. All perennials
except the little tiny yellow and orange celosia.


Here you can see the second layer of
brick border I layed out today.
The grand finale!


One last thing about green things...look at my cherry tomato plant growing like a rockstar!! For cool temperatures I can't believe how fast it is producing tasty tomatoes! Whoo hoo!

I can't believe how much you can get done when you actually leave work at a normal hour. Between work and school this past semester I was coming home at 8:30 p.m. on Monday, 7 p.m. on Tuesday, 10 p.m. on Wednesday, 5:30 p.m. on Thursday and 5 p.m. on Friday. After five months that takes a toll on your soul but I do what needs to be done to get through a full-time job and my Ph.D. coursework plus commuting to Columbia for class (12 hours of driving each week this semester).

All that being said, wow does it feel good to leave work around 5. Today I even left at 5:30 p.m. and still had a chance to come home and change into gardening clothes, go buy more bricks at Home Depot, lay out the bricks, mulch the flower bed, check on the other plants around the yard, make dinner, bake kale chips, watch an episode of Treme on DVD, load the dishwasher, hand wash the big dishes, clean up the kitchen, AND start my blog all before 10 p.m. Wow!

So, what did we have for dinner you ask? Cauliflower and Chickpea Stew with Couscous. Today was a retirement potluck lunch for one of my coworkers and I volunteered to bring a veggie tray. I, being a fan of cauliflower, purchased some for my veggie tray but sneakily didn't put all of it out for the potluck so I'd have some leftover for recipes at home.

If you haven't checked out this white vegetable either roasted, au gratined, mashed, or (after tonight) stewed then you are missing out. In fact, because I'm such a fan I'll give you not one but TWO yummy recipes that just might change your mind about cauliflower.

Ok, back to dinner.  In my weekly dinner menu I had planned to make spinach and chickpea curry last night. However, while sitting on the front porch enjoying the beautiful weather we were suddenly forced by said weather (twist our arms) to proceed immediately to the upper deck at Woody's and eat hot wings out on the deck. (Both the deck and the hot wings are some of Kirksville's best kept secrets so shhh!) It just happened and they were delicious. So tonight with the addition of the leftover cauliflower, I got to make a recipe from Real Simple that I had saved from the December 2010 issue.

Erin's version
Real Simple's version
Here is the link to the recipe, though tonight I was out of raisins and added a little kale since I was light on spinach. It still tasted good and it tasted even better with a kick of hot sauce on top.

Cauliflower and Chickpea Stew with Couscous
Real Simple magazine, December 2010

As promised here is a second recipe with cauliflower as the star: Roasted Cauliflower and Raisin Crostini. You may think it sounds weird and yes it looks a little weird too but the flavor combinations are amazing and totally worth taking a chance on.


Here are the cauliflower crostinis guest starring in
my 2010 Holiday Dinner appetizer course
with prosciutto, apple, and gorgonzola crostinis
and Domaine Chandon Blanc de Noir sparkling wine

I challenge you to try either of these recipes. Then tell me what you think. I hope that you'll take a new look at this poor vegetable that always gets left behind on the veggie tray.

P.S. Jason and I are brewing two of my beers on Saturday so stay tuned for some homebrew action coming soon.

Sunday, May 15, 2011

Gardening...in the rain?

Who knew that gardening in the rain could be so much fun...once you put raingear on. I'm sure I caught a few strange glimpses through the neighbors' blinds but after 3 trips each to Home Depot and Wal-mart (long story) this is what I ended up with.

Jason and I each got to keep a small portion of our tax refund to spend on whatever we wanted so I chose to spend mine on a) something that will be revealed soon enough on this blog and b) more landscaping. I've wanted to put a small garden on the north side of the house. The previous owner parked a trailer on the side of the house so there was an open patch of soil with no grass growing. This is my first attempt at making a garden from an area of the yard and it will probably take several attempts but here is what I accomplished today in Jason's raingear. It finally stopped pouring right before I finished and placed these flowers in their soon-to-be homes.


I also bought two shepard's hooks
and hanging baskets for them.


I love these pretty purple flowers.


These are called a fuchsia hybrid. They look so bright and
tropical for Kirksville I had to get them...and they are only
part sun so they shouldn't mind the front porch shade. 

I ran out of potting soil so hopefully these herbs won't be
too mad when I replant them in deeper soil tomorrow.
I'm finally going to have flat leaf italian parsley in Kirksville.
Awesome! Plus thyme and sage!


Now for the garden plot we have English daisy.


Yellow celosia


Orange celosia


Salvia

More purple salvia


Yellow Asiatic lily

Coreopsis - Tickseed


Another Asiatic lily called
"Tiny Ghost"...such a beautiful color

Here's my progress so far...wish me luck!
Not sure if this is ending on a happy note but these
two appear to be shacking up in the comfort of our hose.
They've been almost literally attached at the hip about 1 foot
from where they are now all weekend. Sadly, since their
current location was the grave site of a cat-eaten bunny
we are a little worried about their love shack location...
especially if they are sitting on a nest.

A great week of eating

Throughout the week I've meant to blog about whatever I was making for dinner because we ate very well this week. In the end I didn't get time until today so now here's a recap of the highlights.

Starting this month, Jason and I have tried to stick to a financial diet (as I like to call it) where we attempt to adhere to a very strict budget. (I'm happy to report that so far we've done very well!) One of the consequences of our financial diet is that I must be extra creative to use what we have at home in a such a way that we don't purchase near as many groceries each week as we used to.

Thanks to the generosity of my mom and Joseph, we have a freezer stocked with local pork and beef (local to Lawrence, KS at least) so I'm always trying to find an easy recipe to use what meat we have. This one was a big hit this week!

Spiced Pork Chops with Apple Chutney (plus some Steamfresh veggies from the freezer)


The recipe actually uses a grill pan indoors to prepare the pork but I decided to throw the chops on our gas grill.
This is another gem from Cooking Light's Complete Meals in Minutes

30 minute recipe
Spiced Pork Chops with Apple Chutney

Chutney:
1 tablespoon butter
5 cups (1/4 inch) cubed peeled apple (about 3 apples)
1/4 cup dried cranberries
3 tbsp brown sugar
3 tbsp cider vinegar
2 tsp minced peeled fresh ginger
1/4 tsp salt
1/4 tsp dry mustard
1/8 tsp ground allspice

Pork:
3/4 tsp ground chipotle chile pepper
1/2 tsp salt
1/2 tsp garlic powder
1/2 tsp ground coriander
1/4 tsp black pepper
4 (4-ounce) boneless center-cut pork loin chops, trimmed
Cooking spray

1. To prepare chutney, melt butter in a non-stick skillet over medium-high heat. Add apple; saute 4 minutes or until lightly browned. Add cranberries and next 6 ingredients; bring to a boil. Reduce heat, and simmer 8 minutes or until apples are tender; stir occasionally.
2. To prepare pork, while chutney simmers, heat a grill pan over medium-high heat. Combine chipotle and next 4 ingredients; sprinkle over pork. Add pork to pan; cook 4 minutes on each side or until done. Serve wtih chutney.

Yield: 4 services (serving size: 1 chop and about 1/3 cup chutney).

**Here's where I diverted from the recipe. First, I griilled bone-in pork chops (what we had on-hand) using the following instructions I found online. Preheat grill on high. Lay down the chops for 1 minute, flip and grill another minute. Then turn down heat to medium and rotate the chops a quarter turn to give them diamond grill marks. Grill 3 minutes then flip and grill another 4 minutes on low.

I usually have a hard time trusting grill recipes but I put followed the directions. Then put the chops on a plate and covered it with aluminum foil to rest. The online instructions recommending resting 5-10 minutes so I went back inside and started the chutney.   

Another night this week I relied on Real Simple magazine's "10 ideas for: ground beef" section of the January 2010 issue. This is a regular item in the magazine and one of my favorites. My first foray into new ideas for ground beef - Mediterranean beef pitas.
You too can access the quick, easy, and delicious recipe from Real Simple here.

Crunchy taco night and homemade margarita pizza with spinach both were consumed before thoughts of pictures came to mind. Whoops!!

For breakfast on both Saturday and Sunday, I FINALLY tried Mark Bittman's More-Vegetable-Than-Egg-Frittata that I printed from his column on July 15, 2009. That's a long time to hold onto a recipe without trying it! Here is my version of his recipe.

1. Used 1 tbsp olive oil and 1 tbsp butter in an oven-safe skillet and turned heat to medium. When hot and melted, added sliced vidalia onion, sprinkled it with salt and pepper, cooked 3 minutes and then added thinly sliced (and rinsed) potatoes. I cooked the potatoes for about 7 minutes and then added 1-inch pieces of fresh (and local) asparagus and fresh green pepper (not local yet). Then I realized that I was supposed to turn the heat up when I first added the veggies. :-) Oops! I continued cooking the veggies for another 5 to 7 minutes until the potatoes were tender and the asparagus was tender but firm.

2. Added torn basil leaves and turned the heat to low. Cooked the basil and veggies another minute or so while I scrambled the egg.

3. Beat 3 local eggs with 1/3 cup shredded parmesan, a little salt, and some black pepper. Poured the mixture over the veggies and then turned the pan back and forth until the egg coated the entire bottom of the pan. Then I let the eggs cook until set and tossed the whole pan under the broiler for two minutes to set the top. (Bittman says it takes 10 minutes or so to set but my pan and stove must hold the heat because it only took a 3 to 4 minutes to set.)

This morning, instead of asparagus, green pepper, and onion, we had leftover taco meat and spinach. I think this is my new favorite "kitchen sink" recipe where I can dump in anything.

Since Mark Bittman's yield was 2 or 4 servings, Jason and I opted for the 2 servings and each ate half the pan. But really that is the beauty of this recipe. You'll feel like you're getting a lot of food when you're really getting a lot of veggies with only 1 1/2 eggs!    

Brown Butter Gnocchi with Spinach and Pine Nuts

As I mentioned in the last post, I tried to reward my mom for her hard work by feeding her tasty meals. You saw the pictures from Sunday's Mother's Day brunch but now let's talk about dinner the night before.

It wasn't anything too fancy since we'd been working all day and hardly wanted to spend more time in the kitchen just to eat something. Then we decided that Jason actually needed to make us dinner since he missed out on the yard work. We sent him to the store to pick up some steaks while we finished up the last of our projects and then we put him to work in the kitchen. 

While I grilled sirloin steaks outside, Jason made Brown Butter Gnocchi with Spinach and Pine Nuts. This recipe goes great with something grilled or all on its own.


Here's a pic from the first time I ever made this dish.

Here's the cookbook photo...pretty close
(minus the professional photography) huh?


Here's the recipe for those of you that are now jealous and would like to try this at home. It comes from one of my go-to cookbook's Cooking Light's Complete Meals in Minutes. All of the recipes are 30 minutes or less and so far they have all been terrific. Also, in case you have never tried gnocchi before go for it! They are little italian potato dumplings with a slightly chewy texture due to the addition of flour. You can purchase them pre-made as I did. In Kirksville, you can find them at Wal-mart and Hyvee on the shelf next to other dry pastas. In fancier grocery stores in other towns, you might also find them with refrigerated fresh pasta.

15 minute recipe
Brown Butter Gnocchi with Spinach and Pine Nuts from Cooking Light's Complete Meals in Minutes

1 (16-ounce) package vacuum-packed gnocchi (such as Vigo)
2 tablespoons butter
2 tablespoons pine nuts
2 garlic cloves, minced
1 (10-ounce) package fresh spinach, torn
1/4 tsp. salt
1/4 tsp. freshly ground black pepper
1/4 cup (1 ounce) finely shredded Parmesan cheese

1. Cook gnocchi according to package directions omitting salt and fat; drain.
2. Heat butter in a large nonstick skillet over medium heat. Add pine nuts to pan; cook 3 minutes or until butter and nuts are lightly browned, stirring constantly. Add garlic to pan; cook 1 minute. Add gnocchi and spinach to pan; cook 1 minute or until spinach wilts, stirring constantly. Stir in salt and pepper. Sprinkle with Parmesan cheese.

Yield: 4 servings (serving size: 1 cup gnocchi mixture and 1 tablespoon cheese)
Calories: 289; Fat 10.8g; Protein 9.5g; Carb 40.3g; Fiber 1.8g; Cholesterol 20 mg; Iron 2.2 mg; Sodium 877 mg

I'd love to hear your feedback if you give this recipe a try.

Mother's Day Weekend

Some people would think my mom is crazy to ever come visit for a "Mother/Daughter" weekend. We accomplish amazing feats in only a weekend of awesome teamwork but other people may think we're crazy. We've set-up apartments, assembled furniture, and landscaped yards. This time we planted and replanted things in containers, mulched the landscaping around the house, and planted some hostas and other perennials on the south side of Jason and my new house. It was a great time and except for one small patch that I still need to mulch, the yard looks beautiful.

Then on Sunday, Jason's mom Alyce came down and we enjoyed a Mother's Day Brunch with the moms.


Here's the tasty menu:
Huevos Rancheros Erin-style (sauteed green pepper, onion, and tomato first; layered tortilla with sauteed mixture, black beans, two eggs, and Merlie's Blue Ribbon Green Chili Sauce http://www.merlindaschile.com/products.html from New Mexico)
Oven-roasted potatoes (sprinkled with cumin and ancho chili powder)
Fresh canteloupe and kiwi fruit cup
Mimosas


Jason and I have been taking our friends around to see everything and since you can't all swing by our house here's your tour of the yard.

Remember the basil plants that I had in the smaller tray with rosemary? We replanted one basil plant in a container and then split the other plant into four. Anything to grow as much basil as possible is great!
 
The same planter with smaller basil plants this time.


My nasturiums are growing like crazy!


We picked up this container and added osterspermum and
Lobelia with two more basil plants. How fitting is it that
this form of Lobelia is called Lobelia erinus?  

The south side of our house is in almost permanent shade
from four large pine trees. Unfortunately the grass is a bit thin
but now there are perennials to spruce the place up a bit.


We added three hostas...


Viola with little yellow flowers


and coral bells.

Much better!

Mom hoed and mulched the front while
I cooked dinner (more on that in the next post).


We cleaned up our white lilac bush and
mulched around the back patio and deck.

We replanted the cherry tomato plant
and added a cage.


We moved the red pepper plant to the
former home of the tomato.


Here we added osterospermum, a calibrachoa hybrid called superbells coralberry punch that should creep over the container side eventually, and the last of the basil.


I hope you enjoyed the tour.  None of it would have been possible without my mom's help. Thanks Mom!